Showing posts with label Winter Wishes stamps. Show all posts

Wednesday, April 16, 2014

Miss Kate Cuttables and Peachy Keen Stamps Blog Hop!

Hello everyone!  I am so excited to be a part of this incredible hop! :)

BLOG CANDY GOODNESS:
  • EACH DAY Miss Kate Cuttables is giving away a file to EVERYONE who comments and Follows on the Design Teams' hop post. Be sure to comment on THIS post and FOLLOW my blog!!
  • For your FREE file code, email TheScrapbookingQueen1@gmail.com (after commenting and Following my blog - this will be confirmed before code is sent)
  • GRAND PRIZE by Miss Kate Cuttables is a $25.00 Gift Certificate to someone who hops with us each day this week by commenting and following each blog on the hop. Don't miss any days in the commenting and following to be sure to be in the drawing for this awesome prize!
  • EACH DAY Peachy Keen Stamps is giving away a $25.00 gift certificate! One person will be chosen who has hopped to each blog for that day, left a comment on each blog, and FOLLOWED each blog.
  • GRAND PRIZE by Peachy Keen Stamps is a $75.00 Gift Certificate to one lucky person who follows the hop each day, comments on each blog post, and Follows each blog. Don't miss any days in the commenting and following to be sure to be in the drawing for this awesome prize!
  • For extra chances at the GRAND PRIZELIKE Miss Kate Cuttables Facebook page and JOIN the Miss Kate Cuttables Galleria Facebook Group. Don't forget to LIKE the Peachy Keen Stamps page on Facebook and join The Peachy Place group too!

For my project I decided to use the adorable Snow Princess / Winter Princess cut files from MKC...


For their sweet faces I used 2 PKS sets - Wide Eyed Kids and Princess Faces.  For the sentiments I used two stamps from Scrappy Moms Stamps Winter Wishes set.  I thought they perfectly matched up to the girls story lines in Frozen! :)

I embossed the white layer and added a few gems to finish of the cards for my "Frozen" card set.  (I don't know about your house, but around here we watch Frozen at least a few times a week!  LOL)

Thank you so much for stopping by today - I hope you are having a blast on the hop!

    Tuesday, January 1, 2013

    SMS Tic Tac Toe Terrific Tuesday Challenge Hop

    Thank you so much for joining me on this 1st day of 2013 for the Scrappy Moms Stamps Tic Tac Toe Terrific Tuesday Challenge Hop!  I hope you all had a wonderful New Year's Eve.  :)

    We decided to change this TTC up a little and have some fun. We will be giving away a prize for this TTC all on it's own. In order to qualify for the drawing you will need to visit all the stops on the hop - on the final blog there will be a "Secret Phrase" to find. The challenge portion is to create a project using the Winter Tic Tac Toe board below. Use the 3 items in any row - across, down, or diagonal - to make your project and link it on the Scrappy Moms Stamps blog. Now, comes time for the "Secret Phrase" - you can either mention the phrase in a comment on the Scrappy Moms Stamps blog when you link your project or include it in your actual blog post.


    Here is my project -


    I made a holder for this darling little hand warmers I found at Target.  We always drive up to the snow and my kiddos complain that their gloves don't keep their hands warm enough... so I thought we would give them a try this year.  I used a Bitty Bag as my holder and folded it over, punched 2 hole and tied it closed with a ribbon.  The gloves and snowflakes were SVG files that I cut with MTC.  I used "Warmest Wishes" from SMS The Charmed Life stamp set at the bottom.  I used Marichino twine for the string attaching the gloves. On my snowflakes I used ACTUAL glitter, can you believe it?!  LOL I usually use Stickles but I decided to go "old school" and use glue and loose glitter.  :)  Can you guess which row I used?  It was the right most down column (Glitter, sentiment, die cuts). 

    For your next stop click {{{ HERE }}} .

    We hope you will join us for the rest of the hop and challenge - come link up your project for a chance to win a Scrappy Moms Stamps set of your choice. :)

    Thursday, July 21, 2011

    Christmas in July - Holiday Planner


    Thank you so much for joining me for my Holiday Planner project for Christmas in July hosted by Giselle from Cross My Heart Paper Crafts!

    Warning: LOTS of photos, so here we go...


    In the 1st pocket we have covered notebook for writing down your present list. I wanted it to be covered from peaking eyes. :) In the third pocket there is a receipt envelope. This is just a legal size envelope that was sealed and then I cut about 1.5 inches off one side so that it fits well in the planner.


    In the 2nd pocket I made a folder to hold my return address labels, labels I printed from my Christmas card list, and stamps. That way when I am ready to send my Christmas cards I can grab this folder and everything is ready to go!


    In the last pocket I have notebook paper and a calendar on the front to help keep track of events and errands. I stamped different Christmas sentiments on the paper to keep in the holiday theme. I did three of each stamps so there is a total of 21 papers.


    I also added a loop pen holder on the side because I NEVER have a pen when I need one! LOL I attached a long ribbon on the back side of the planner to keep it tied neatly together so it can easily fit in a purse. The total size is 7.5" x 4.75"

    Here is one more shot of the planner open and filled.


    Want to know the biggest secret? IT'S MADE FROM A 2-POCKET SCHOOL FOLDER just like this one...


    I cut it down to 7.5" high and then folded each side in half - TA-DA, a pocket planner! Now just cover with paper and embellishments. :)

    Hope you enjoyed my holiday planner - thank you so much for stopping by! Remember to leave a message on my post HERE to be eligible to win a Scrappy Moms Stamps Winter Wishes stamp set.

    {{{ HUGS }}}

    Saturday, December 18, 2010

    Homemade Christmas Blog Hop!

    Merry Christmas and welcome! I'm sure you enjoyed Elsa's project, isn't she fabulous?!

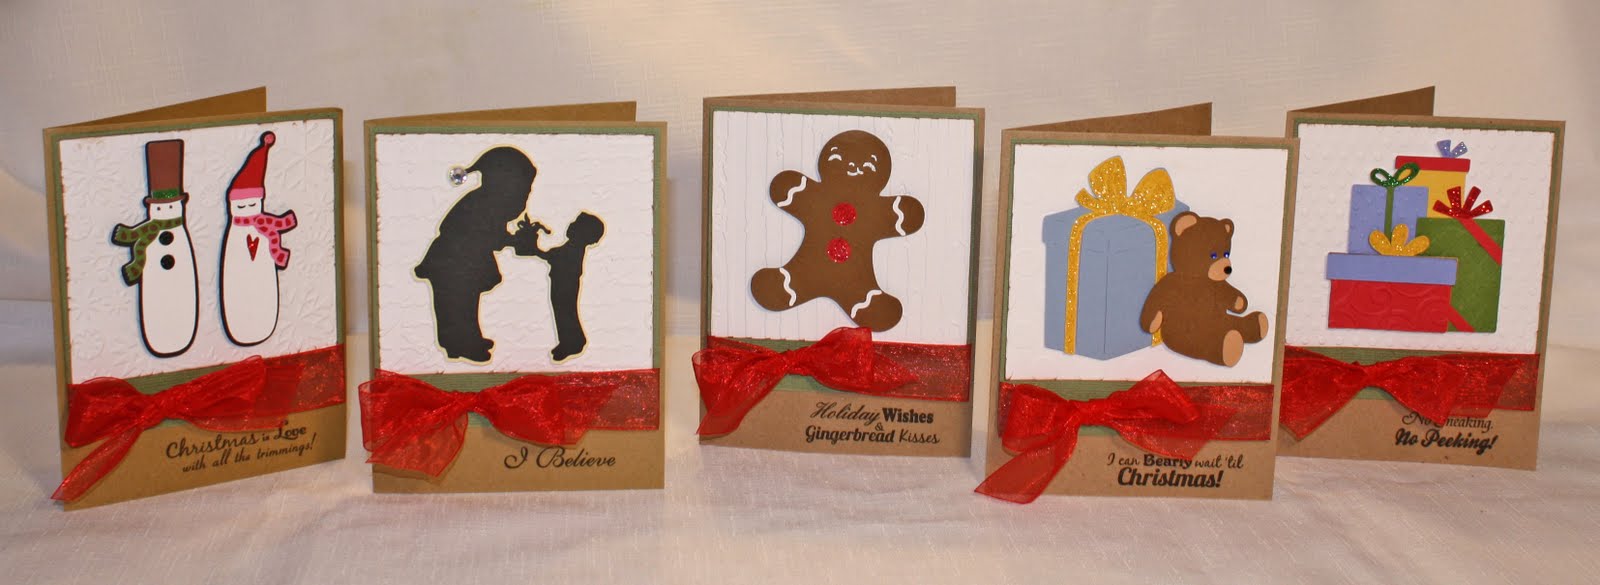
    Thank you for joining me today - I hope you like what I have to show you! These are my Christmas cards for this year. I made 2 sets of 10 different cards for a total of 20 handmade Christmas cards - whew!! :)


    I used the same basic layout for all the cards - a mat of green cardstock with a white mat on top that I Cuttlebug-ed. I used the Snowflake, Distressed Stripe, Argyle, Swiss Dots, Polka Dots, and Script embossing folders by Cuttlebug and the Large Dots embossing folder by Quickutz. I use red Organdy ribbon from Joanns. Oh, a note about this ribbon - YUCK! I thought because it was sheer it would be easy to manipulate - boy, was I wrong! I would have picked a softer sheer ribbon if I had to do it again, this one was really stiff.
    The Santa is cut from A Childs Year. The trees, mouse, baby Jesus, and presents are from Winter Frolic. The gingerbread man is from Just Because Cards. The Snowpeople and reindeer are from Winter Woodland. The angel and teddy bear are from Christmas Solutions, while the present the bear is leaning up against is from Sweethearts and stretched on my Gypsy. Wow was that lots of info!!!
    It's hard to tell but I used Stickles or some kind of bling on each card - take a peek at some closer pictures to see if you can find it! LOL


    The stamps are from Scrappy Moms Winter Wishes and The Charmed Life stamp sets. :)
    I hope you enjoyed my cards! For blog candy I a giving away your choice of a Scrappy Moms Stamp set! Just leave me a comment for an chance to win - of course, if you like what you see here I'd love to have you join in and follow me. :)
    Your next stop on the hop is the wonderful Amanda from My Scrap Obsession! Enjoy!
    Yuletide {{{ HUGS }}}


    Friday, November 19, 2010

    The Gift Giving Season Has Started! :) ** Info Update!

    We had the last meeting for the year at my MOMS group so I made little gifts for all the ladies at my table. I started off making a cute little fall-themed project I saw on Greenbean's Crafterole (if you haven't visited her before take a few minutes for look around - she's awesome!! ) - soap leaves! Then I made some homemade caramel corn (Yum!) and put it in these cute little holiday buckets with the recipe on top.

    Last, but not least, I made little angel Christmas tree ornaments from butterfly paperclips. YES, PAPERCLIPS! I saw this idea on line while looking for a craft project for my Brownie Girl Scout to do with her troop at their Christmas party.

    You use ribbon, one paperclip, one round silver bead, and one decorative spacer bead for the halo. I made this tiny (3.5"x 2.5") card as my delivery method. I was going to make a box but I figured this would do double duties as greeting card. I punched the side with Fiskars Apron Lace border punch and punched a hold for the end of the ribbon to fit through. I taped the tail of the ribbon the the inside cover of the card and lined the other side with white cardstock so there would be contrast behind the punch. The "You're an Angel!" stamp on the front and the "Sending you Christmas blessings" stamp I used on the inside are from our Scrappy Moms Winter Wishes stamp set. ** Just wanted to share a little hint in case you want to make these little ornaments yourself. The silver beads have pretty small holes since they are made for jewelry wire - I used a needle threader and pulled one side of the ribbon through 1st, then put the needle threader back in and pulled through the 2nd side of the string. I tried to do them both at the same time but it was too thick. I didn't mind doing it twice, it's kind of therapeutic! LOL **
    The ladies really seemed to enjoy their little gifts - hopefully, I can keep up the crafty gift production through the holiday! LOL
    Have a wonderful weekend! See you next week when The Scrappy Moms DT will be introducing a brand new stamp set! :)

    Thursday, November 4, 2010

    1st Christmas Card :)

    Hi, everybody! I just wanted to share a Christmas card I made last week, I know - it took me a while to take the picture and get it on. LOL


    The tree with the little birdie is from Winter Frolic cut at 4.3" on my Gypsy. I bought the background paper at Joann's but not sure of the maker. The stamp is from the Scrappy Moms Stamps Winter Wishes. :)

    I put a little white embossing powder on the tops of the branches to look like snow and added a little bling with the crystal gems.

    Hope you enjoyed my little card. Have a WONDERFL day!

    Thursday, September 23, 2010

    IT"S TIME - Winter Wishes is HERE!!

    Good day!!! Tammy and I are so excited to announce that we are taking pre-orders for our brand new Scrappy Moms Stamps Winter Wishes Set.

    Here is the full set...


    You can click on the button on the right side-bar here to purchase. You can also order on the Scrappy Moms Stamps blog. :)

    The stamps were shipped to us and we expect them to arrive by Wednesday (9/29) and beging shiping on Thrusday (9/30).

    The design team will have more samples to show you over the next week or so - keep an eye out.

    I also wanted to take a minute and say "Thank you" for ALL of your wonderful support and love! You don't know how much it means to Tammy and I - WE LOVE YOU!!!! Without you, Scrappy Moms wouldn't exist!

    Huge {{{ HUGS }}}!

    Wednesday, September 22, 2010

    Winter Wishes Sneak Peek! :)

    Hello, all!

    Here is another Sneak Peek card using the new Scrappy Moms Stamps Winter Wishes set!


    I couldn't decided whether or not it needed some doodling so I decided to leave it as is - I think it still turned out pretty cute. :)

    The cake is cut from Winter Frolic at 3.25" and I used the new Polka Dots embossing folder from Cuttlebug for the bottom green section. I used some Stickles on the holly leaf and berries.

    I hope you enjoyed this little card - maybe it will help speed up some cooler weather, it's 93 degrees here!

    LinkWithin

    Related Posts with Thumbnails